Figure Drawing
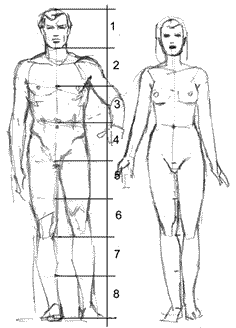
Proportion
- An average person, is generally 7-and-a-half heads tall (including the head).
- An "ideal figure", is drawn at 8 heads tall.
Draw line down the paper (the height of the figure)
Find the midpoint of the line (hips)
Divide top section (bottom of the chest)
Divide top section (bottom of the chin)
Divide mid-section (belly button)
Divide bottom area (knee)
Draw an oval for the head
Collar bone halfway between chest and chin
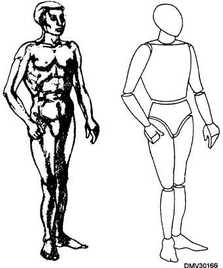
Drawing the figure as simple 3D Forms
Examine the figure in terms of basic forms.
Reduce the figure to cubes, spheres, cones or cylinders
Examine the figure in terms of basic forms.
Reduce the figure to cubes, spheres, cones or cylinders
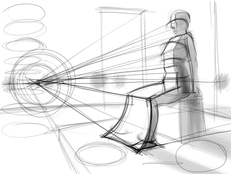
Drawing the figure in Perspective
Keep perpective in mind when drawing figures. (Ok to start with a box)
Keep perpective in mind when drawing figures. (Ok to start with a box)
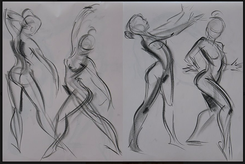
Gesture Drawing
- Quickly capturing the spirit of the pose
- Keep eyes on the subject as much as possible
www.youtube.com/watch?v=xbE0vYgng00
Start with a "line of action"
- A strong line that best expresses the pose (can be tricky to find!)
- Imagine you can draw only one line to represent your subject.
- Easier to find the line of action in dynamic "action" poses
- Look for the longest axis
- Use C or I shaped curves.
- Relaxed vs Tense curves - long fluid curves are relaxed, more bended shows energy and tension
(seen in the ocean - rolling waves = calm, storm = zig-zag shaped waves
- Draw contours (edges). Try to get as much of the figure draw right away (makes sure it will fit, and check proportions)
Ok to for lines to change or become scribbly, keep drawing over original lines (don't erase)
- Try to show MASS. Add lines or circles for muscles, or belly.
- Keep your hand moving!
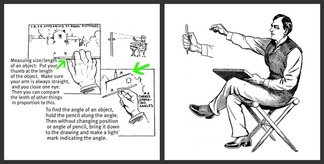
Sighting
Using this method, it is important to stand in the same place, and to keep your head as still as possible when measuring, and to extend the arm fully with elbow straight, each time a measurement is made. You should not be too close to the model.
Remember that the basic unit in figure drawing is the model's head, from top to chin. Holding your pencil in a fist with the thumb upwards, and arm stretched out fully, close one eye and align the top of your pencil with the top of the model's head, and slide your thumb down the pencil until it aligns with the model's chin. There you have your basic unit of measurement on the pencil. Repeat this step whenever necessary.
Estimating angles against convenient verticals is a useful way of checking that the direction of lines within the pose are accurate. Sometimes existing features - a doorway behind the model, and the edge of the paper - provide this reference. This is an excellent way of minimising error and ensuring a correctly proportioned figure.
Figure Drawing Project
Create a mixed media project using a variety of figure drawing. You can choose to focus on one model or incorporate several models.
Use a different medium each day:
Graphite, charcoal, oil pastel, pen and ink, tempera, watercolor, chalk, crayon and colored pencil.
Use a color scheme:
Monochrome, Analogous, Complementary, Split-Complementary, or Triadic
Tips:
Layer drawings on top of each other.
Collage your favorite parts into one page.
Incorporate gesture drawings (30 sec-5 mins) with portrait and detail drawings.


|


|


